Giovanny Gongora • Wednesday, February 9, 2022

AUTHOR
GG
Giovanny Gongora, Senior Software Engineer
Giovanny is a Senior Software Engineer with experiece in interpreters, programming languages design, OS development, embedded systems and web development. Rust, C, Node.js and JavaScript are his preferred languages to work with.
Learning Rust as been a big part of me when I started in 2015 just before joining Mozilla. Since then I have been working heavily with Node.js in different scenarios and fixing performance problems for big companies that relay on Node.js for high availability and stability of their services. I learned there are situations where you need to offload part of the heavy work to an add-on architecture, usually in C++, to implement more complex and resource efficient processing or calculations that JS can’t hit easily.
If you have built a Node.js add-on before, you know your options are C++ only, but this changes soon, you can use Rust now to build Node.js add-ons, yay! I love seeing Rust code getting in production services and keeping all the promises it gives us filling the gaps in Node.js apps.
We are going to learn how to start our first Node.js add-on with Rust using NAPI-RS. You need to install NAPI-RS first with your preferred package manager:
yarn global add @napi-rs/cli
# or
npm install -g @napi-rs/cli
# or
pnpm add -g @napi-rs/cli
Create a new project:
napi new
Follow the steps to generate a template add-on project in the wizard. The cool thing is now we have a working environment where you can compile your source code into different architectures and easily require the final binary into you Node.js application.
We are going to create a module that exposes a class with multiple methods. Let’s start opening the lib.rs file inside the src folder, this file has a sample code to create and add-on that sums two numbers, let’s clean all the content in this file and start using the Coding Assistant to start the structure of the using a recipe.
Inside the init function, let’s define the name of the class that is going to be exposed from the add-on.
#[module_exports]
pub fn init(mut exports: JsObject) -> Result<()> {
exports.create_named_method("InitProcessData", process_data_class)?;
Ok(())
}
The class_constructor is where we are going to define an internal value of initialization to use later with the methods we create, let’s define the struct that will represent the type of property we are going to define inside the class construct.
struct NativeClass {
value: i32,
}
Inside the function, first we need to expect to get a number param passed to initiate the property init in the class:
let init_value: i32 = ctx.get::<JsNumber>(0)?.try_into()?;
Catch and assign the value. If you want to change the name of class property, change the string defined in the line of this.set_named_property, you get something like the following:
let mut this: JsObject = ctx.this_unchecked();
ctx
.env
.wrap(&mut this, NativeClass { value: init_value })?;
this.set_named_property("init", ctx.env.create_int32(init_value)?)?;
ctx.env.get_undefined()
Now, we can define the structure of class and the methods in the process_data_class. Get the number param passed from the JS side to the class initialization in the native side:
let init: i32 = ctx.get::<JsNumber>(0)?.try_into()?;
We can start to define properties of the class, let’s define one method that takes the init value inside the class, adds 6 and returns the value:
let add_six_method = Property::new("addSix")?.with_method(add_six);
Define the class that is going to be initialized in the native side. Remember to pass the method variable defined before, in this case add_six_method, at the end, should look like:
let process_data_class =
ctx
.env
.define_class(
"InitProcessData",
class_constructor,
&[add_six_method]
)?;
process_data_class.new_instance(&[ctx.env.create_int32(init)?])
Finally, we need to define what the method we previously defined, is going to do, this basic method is going to get the internal init property of the class and add 6, then return it.
#[js_function(1)]
fn add_six(ctx: CallContext) -> Result<JsNumber> {
let this: JsObject = ctx.this_unchecked();
let native_class: &mut NativeClass = ctx.env.unwrap(&this)?;
native_class.value += 6;
ctx.env.create_int32(native_class.value)
}
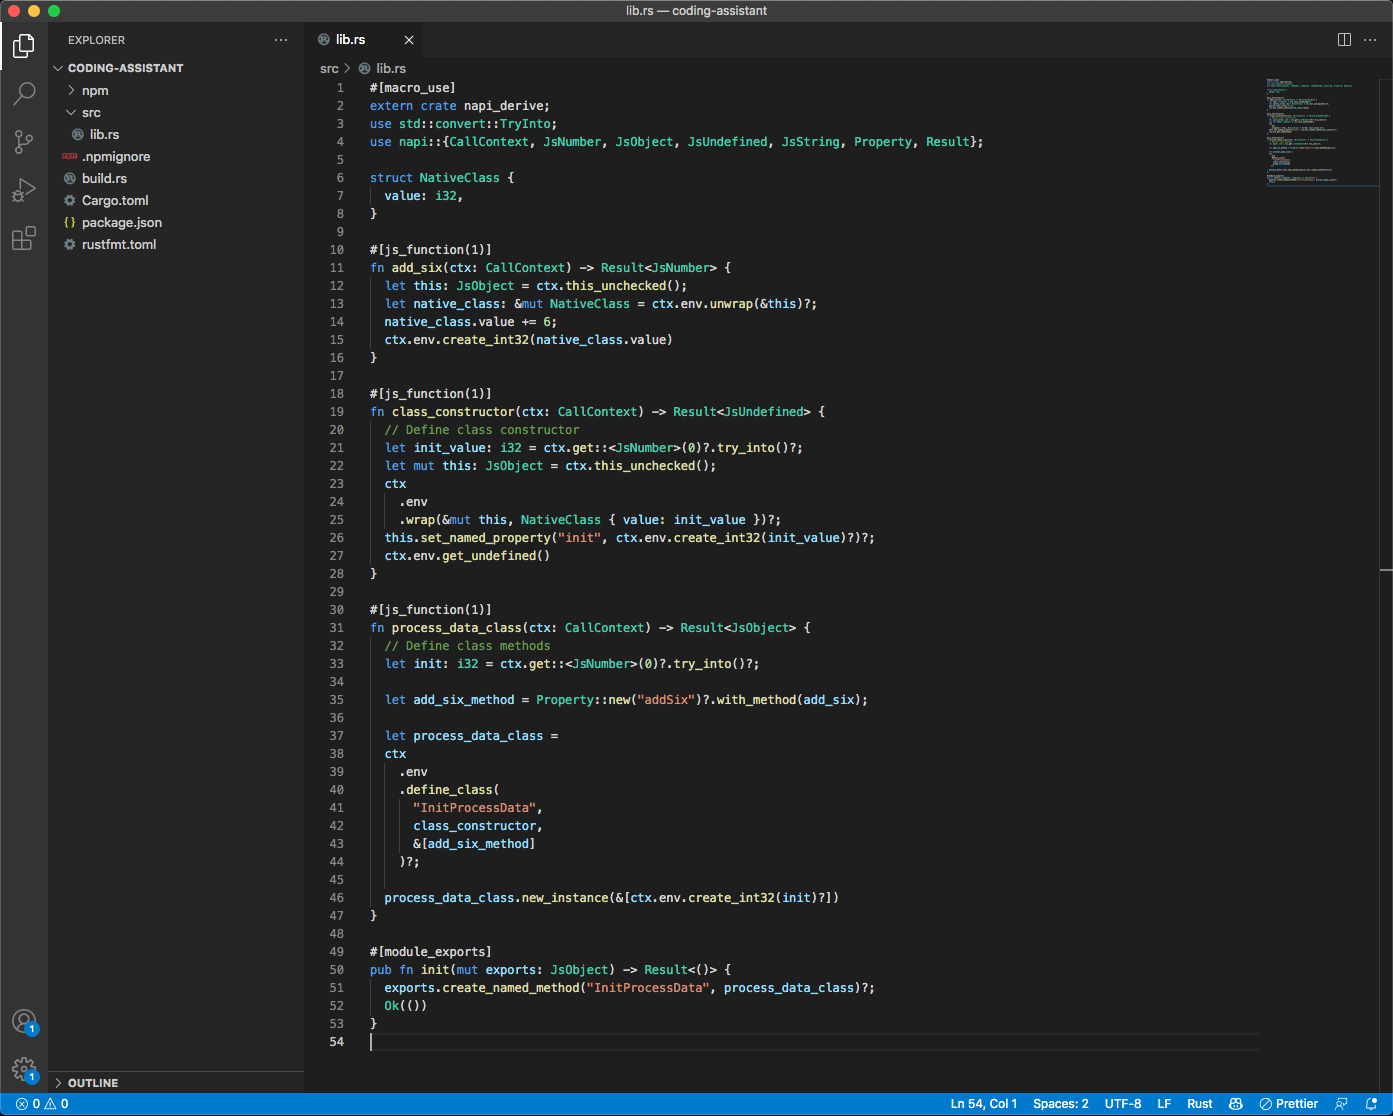
This is how our lib should look like at this stage:
Before we build our add-on, we need to make a few changes in the Cargo.toml file, make sure you have the following sections set:
[features]
latest = ["napi/napi8"]
napi3 = ["napi/napi3"]
[dependencies]
# Default enable napi4 feature, see https://nodejs.org/api/n-api.html#node-api-version-matrix
napi = { version = "2.0.3", default-features = false, features = ["compat-mode"] }
napi-derive = { version= "2.0.7", features = ["compat-mode"]}
[build-dependencies]
napi-build = "1.2.1"
After everything is set in the Cargo.toml file, you can run the following command to get a binary target compiled of your add-on and the rest of the JS files generated to use it:
npm run build
# or
yarn build
If everything goes right, you should have a bunch of new generated files and a *.node file that you can use with your Node.js application. To use it in the Node.js side, you need to open the index.js file in the root of the folder, this file was generated when you run the build command previously. Go to the bottom of the file and add the following lines:
const { InitProcessData } = nativeBinding;
module.exports.InitProcessData = InitProcessData;
We use this file and not require the native module directly? If you watch closely the file, it handles for you what naming convention for the binary to use depending on the platform is going to be run, and let you know if you are going to run a binary in a different architecture to the ones it was built for. It’s extremely useful and recommended to have this guard checks when working with native add-ons.
To test our Rust add-on in the Node.js side, we need to create a file names test.mjs with following content and make console.log the method calls:
import pkg from "./index.js";
const { InitProcessData } = pkg;
const ProcessData = InitProcessData(20);
console.log(ProcessData.init);
console.log(ProcessData.addSix());
You should see this output in the terminal:
$ 20
26
From here is up to us to continue adding more methods that can do more stuff, for example, a method to multiply by ten the value of the init property inside the class:
#[js_function(1)]
fn multiply_ten(ctx: CallContext) -> Result<JsNumber> {
let this: JsObject = ctx.this_unchecked();
let native_class: &mut NativeClass = ctx.env.unwrap(&this)?;
native_class.value *= 10;
ctx.env.create_int32(native_class.value)
}
A method to divide by two the value of the init property inside the class:
#[js_function(1)]
fn divide_two(ctx: CallContext) -> Result<JsNumber> {
let this: JsObject = ctx.this_unchecked();
let native_class: &mut NativeClass = ctx.env.unwrap(&this)?;
native_class.value /= 2;
ctx.env.create_int32(native_class.value)
}
A method to rest another passed to the function param two the value of the init property inside the class:
#[js_function(1)]
fn rest(ctx: CallContext) -> Result<JsNumber> {
let num: i32 = ctx.get::<JsNumber>(0)?.try_into()?;
let this: JsObject = ctx.this_unchecked();
let native_class: &mut NativeClass = ctx.env.unwrap(&this)?;
native_class.value -= num;
ctx.env.create_int32(native_class.value)
}
Or a simpler method that returns a string to say hi to a name you pass to the method:
#[js_function(1)]
fn say_hi(ctx: CallContext) -> Result<JsString> {
let name = ctx.get::<JsString>(0)?;
let complete_message = format!("Hello {}! Good to see you 🦀 here again.", name.into_utf8()?.as_str()?);
ctx.env.create_string_from_std(complete_message)
}
If you want to be able to expose these methods, make sure you define them inside process_data_class like the previous add_six_method:
let multiply_ten_method = Property::new("multiplyByTen")?.with_method(multiply_ten);
let divide_two_method = Property::new("divideByTwo")?.with_method(divide_two);
let rest_method = Property::new("rest")?.with_method(rest);
let say_hi_method = Property::new("sayHi")?.with_method(say_hi);
let factorial_method = Property::new("getFactorial")?.with_method(get_factorial);
And make sure you add them to the array of defined methods in the class definition:
let process_data_class =
ctx
.env
.define_class(
"InitProcessData",
class_constructor,
&[add_six_method, multiply_ten_method, divide_two_method,
rest_method, say_hi_method, factorial_method]
)?;
For you to be able to use the exposed methods that were created, you need to rebuild it again:
npm run build
# or
yarn build
In the test.mjs console log the new methods:
console.log(ProcessData.divideByTwo());
console.log(ProcessData.multiplyByTen());
console.log(ProcessData.rest(10));
console.log(ProcessData.sayHi("gio"));
Running the file will give you the following output:
$ 20
26
13
130
120
Hello gio! Good to see you 🦀 here again.
We can add more complex and CPU intensive methods to take advantage of threads outside of the JS execution, lets implement a factorial method, first, define the function to make the calculation:
fn factorial(num: i32) -> i32 {
match num {
0 | 1 => 1,
_ => factorial(num - 1) * num,
}
}
This function looks like something we can re use later and share with people, let’s create a recipe in the Coding Assistant right from the editor where we are working on:
Back to the library, let’s define the method for the class definition:
#[js_function(1)]
fn get_factorial(ctx: CallContext) -> Result<JsNumber> {
let num: i32 = ctx.get::<JsNumber>(0)?.try_into()?;
ctx.env.create_int32(factorial(num))
}
Define the method property in the process_data_class function:
let factorial_method = Property::new("getFactorial")?.with_method(get_factorial);
And add it to the list of array methods:
let process_data_class =
ctx
.env
.define_class(
"InitProcessData",
class_constructor,
&[add_six_method, multiply_ten_method, divide_two_method,
rest_method, say_hi_method, factorial_method]
)?;
Rebuild the library:
npm run build
# or
yarn build
Add a new console log to test the method:
console.log(ProcessData.getFactorial(10));
You’ll get the following output:
$ 20
26
13
130
120
Hello gio! Good to see you 🦀 here again.
3628800
This is how you create Node.js add-ons in Rust, from here, you can check the official documentation to know all the things NAPI-RS have available and you can use to extend the capabilities of your Node.js add-ons. And feel free to create and use coding assistant recipes a long the way!